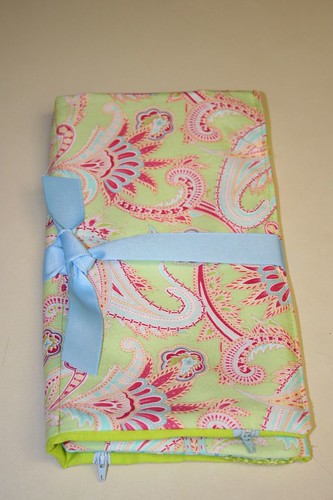
Last year I was browsing the Red Envelope catalog (love their personalized gifts and earrings) when I saw a tiny photo for a leather jewelry wrap. My necklaces are pretty much always tangled because of the petite leather earring box I keep them in at the bottom of my gym bag. (Go figure.) I liked the idea of a small pouch that would help keep everything organized, so I studied the photo, asked Meg for some advice and took this project on as my homemade girlfriend gift for 2007. I ended up making 25 of these and giving them with a piece of handmade jewelry made by a local retired couple.

{Three cheers for my pledge to buy locally and go handmade. Woot!}

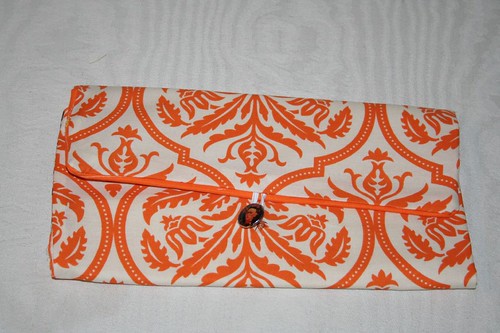

They went over well and I tried not to let the backhanded, “Wow! This is so great. Your sewing is really improving,” sting after the tenth time it was said.
Anyway — a tutorial for you peeps interested in making your own fabulous jewelry wrap:
Supplies:
Cotton fabric
Canvas
Two zippers
Velcro
heavy-weight, iron-on interfacing
A button, needle, thread
Elastic
Directions:
Cut two rectangles measuring 11″ x 18″ from your front fabric and lining fabric. (I varied these.)
Cut one rectangle measuring 11″ x 18″ from your canvas. Set these aside.
Cut one necklace pocket measuring 11″ by 5″ from cotton fabric.
Cut two necklace pocket flap measuring 11″ by 3″ from cotton fabric.
Cut one ring holder measuring 11″ by 4″ from cotton fabric.
Cut one necklace pocket flap interface piece measuring 11″ by 3″.
Prep:
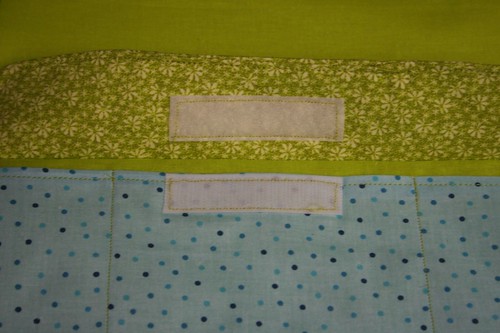
Take your two necklace pocket flaps and pin them right sides together. Now iron on the interfacing to one of these sides. Sew 1/4 inch seam around the edge leaving a 1″ hole to turn your work. Trim corners, turn right side out, press. Gently turn under remaining 1″ and complete with top-stitching around entire outside edge. Fold in half width wise and iron crease in center. Place 1″ piece of Velcro 1″ above the bottom edge. Sew around edge.
Put to the side. Your pocket flap is now completed.
Take your ring holder fabric and fold it in half length wise. Press crease. Now turn in 1/2 inch of the top and bottom edges toward the crease. Then fold in half again, completely enclosing your exposed edge. {You may have done this trick in the past to make purse handles.} Topstich around all edges. Don’t worry about turning the two ends under. We are going to add Velcro to one end and tuck the other between the seams when we sew all the pieces together.
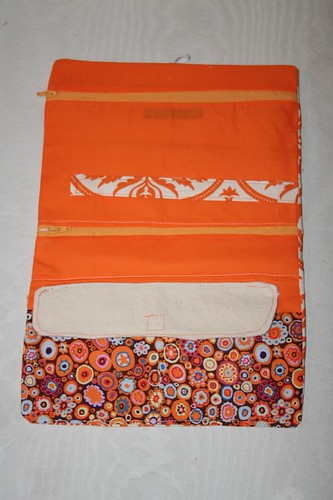
With a rotary cutter, cut your lining fabric into three sections, horizontally. You want these to be varying sizes. Mine were 3″ wide, 6″ wide and 9″ wide.

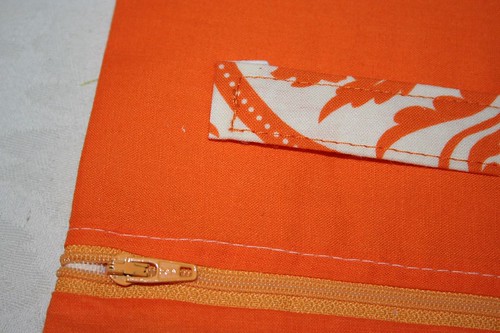
Sew the first two sections back together by adding a zipper. Then sew section one and two (now sewn together as one) with an additional zipper. Your lining fabric should now have three sections, with two zippers running across them horizontally.

Take the necklace pocket and turn under the top (11″) edge twice. Zigzag stitch across this edge. Fold the pocket in half lengthwise and crease with an iron. Center your first piece of Velcro 1″ below top edge. Sew around the edge of the Velcro, attaching it to the necklace pocket. Pin the necklace pocket to the bottom of your wrap, well beneath the second zipper. Pin your completed necklace flap above the pocket, lining up the Velcro so they match.

Now place and pin your canvas rectangle behind your lining fabric. Place and pin your ring holder between your first two sets of zippers. You can either use a hot glue gun to add velcro to the lining and the backing of your ring holder, or you can sew these on before sewing the canvas. Your choice.
Carefully sew a 1/2″ seam around the outer edge of the lining, sewing the canvas to the lining. Then sew a center divider (or two, like the photo above) to create compartments in your necklace pocket. Sew the pocket flap down. Then sew as close as possible to the top of each of the zippers to create actual pockets between the lining and the canvas.
Once these are completed, place your backing fabric and your completed lining right sides together. Place 1″ of coordinating elastic, turned in a loop, sandwiched between these. This will be used as your button closure. Stitch a 1/4″ around all edges, making sure to leave a 3″ gap to turn work right side out. I like to backtack over the elastic to make sure it is sewn firmly.
Turn right side out. Press. Turn under remaining 3″ hole and sew seam shut. Press again. Fold into thirds. Find appropriate placing for button and sew on by hand. Fill with bangles and bobbles and enjoy!